Windows 11 SSD Not Detected during installation? In this guide, I’ll show you the solution that worked for me.
Installing Windows 11 on a new SSD should be a straightforward process. You create a bootable USB drive, boot from it, choose the installation location, and continue with the setup.
Unfortunately, things do not always go as planned.
A surprisingly common problem occurs when Windows 11 reaches the disk selection screen and fails to detect the NVMe SSD. The installer loads correctly, the USB installation media appears, but the SSD itself is nowhere to be found. Without a visible drive, Windows cannot be installed.
The situation becomes even more confusing when the SSD is clearly detected inside BIOS or UEFI settings. At first glance, this makes no sense. If the computer can see the drive, why can’t Windows Setup see it as well?
I recently encountered this exact issue while installing Windows 11 on a laptop equipped with a new NVMe SSD. The drive appeared perfectly in BIOS, but Windows Setup refused to detect it. After some investigation, I discovered that the problem was caused by a BIOS storage setting rather than the SSD itself.
In this guide, I’ll explain why this happens, how I fixed it, and several additional troubleshooting methods that may help if the same solution does not work on your system.
How the Problem Looks During Installation
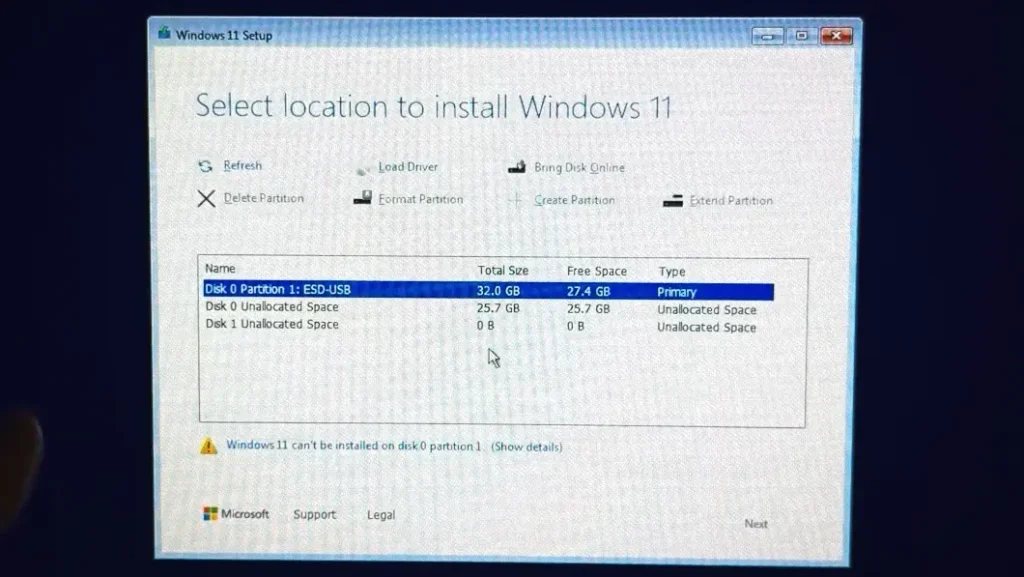
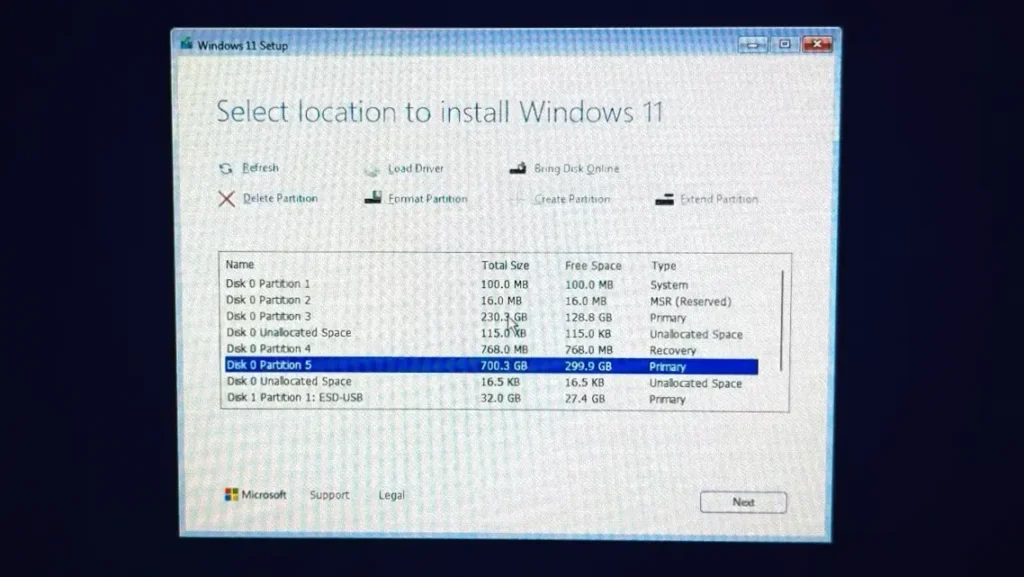
Most users encounter this issue at the disk selection stage of Windows Setup.
After booting from the installation USB drive, Windows loads normally and proceeds through the initial setup screens. Everything appears to be working correctly until you reach the page where Windows asks where it should be installed.
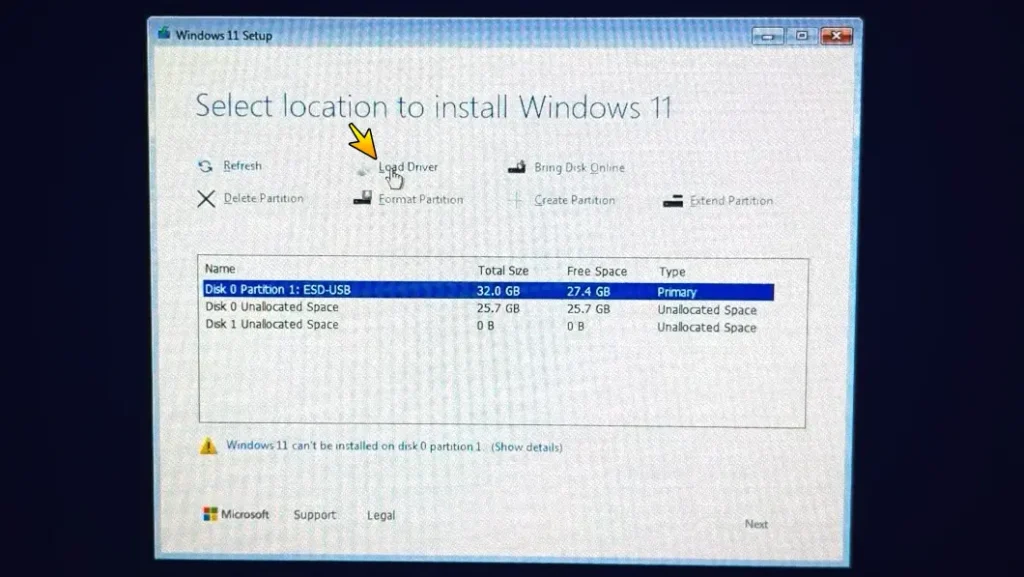
Instead of seeing your SSD, you may see:
- No drives at all
- An empty drive list
- Only the USB installation media
- A message indicating that no drives were found
- A request to load storage drivers
At this point, many people assume one of two things:
- The SSD is defective
- The SSD is incompatible with Windows 11
Fortunately, both assumptions are often wrong.
First Check: Is the SSD Visible in BIOS?
Before making any changes, the first thing you should verify is whether the SSD appears inside BIOS or UEFI.
Restart your computer and enter BIOS.
Depending on the manufacturer, the key may be:
- Delete
- F2
- F1
- F10
- Esc
Once inside BIOS, locate the storage section.
If your NVMe SSD appears there, this is actually good news.
It means:
- The SSD is receiving power
- The motherboard can communicate with it
- The M.2 slot is functioning correctly
- The drive is probably not defective
This narrows the problem down to software configuration rather than hardware failure.
In my case, the SSD appeared normally inside BIOS, which immediately suggested that the issue was somewhere else.
If the SSD does not appear in BIOS, skip ahead to the troubleshooting section later in this guide.
Why Windows 11 Cannot Detect an NVMe SSD
There are several possible reasons why Windows Setup may fail to detect an NVMe SSD.
Understanding these causes can save a lot of troubleshooting time.
Intel Rapid Storage Technology (RST)
This is one of the most common causes.
Intel Rapid Storage Technology is a storage management feature found on many modern laptops and motherboards.
It is designed to support:
- RAID configurations
- Advanced storage management
- Performance optimization
- Drive monitoring
While useful in some situations, RST can create problems during a clean Windows installation.
When enabled, Windows Setup may require special Intel storage drivers before it can communicate with the SSD.
Without those drivers, the SSD remains invisible.
RAID Mode
Many manufacturers ship laptops with RAID mode enabled by default.
Windows installed by the manufacturer already includes the necessary drivers.
However, a clean Windows installation USB often does not.
As a result, the installer cannot see the drive.
Missing Storage Drivers
Some Intel platforms require Intel VMD or RST drivers during installation.
If those drivers are missing, Windows Setup may not detect the storage controller.
BIOS Configuration Problems
Incorrect storage settings can prevent Windows Setup from communicating with the SSD.
This issue is particularly common on newer laptops.
Outdated BIOS
Although less common, an outdated BIOS version can occasionally cause storage detection issues.
Updating BIOS may improve compatibility with newer SSDs.
AMD Systems Can Experience Similar Issues
Although Intel Rapid Storage Technology is one of the most common causes, AMD-based systems can experience similar behavior.
The exact BIOS settings may be different, but storage controller options, RAID settings, or storage remapping features can sometimes prevent Windows Setup from detecting an SSD.
If you’re using an AMD system, review your motherboard or laptop documentation for storage-related BIOS options.
The Solution That Worked for Me
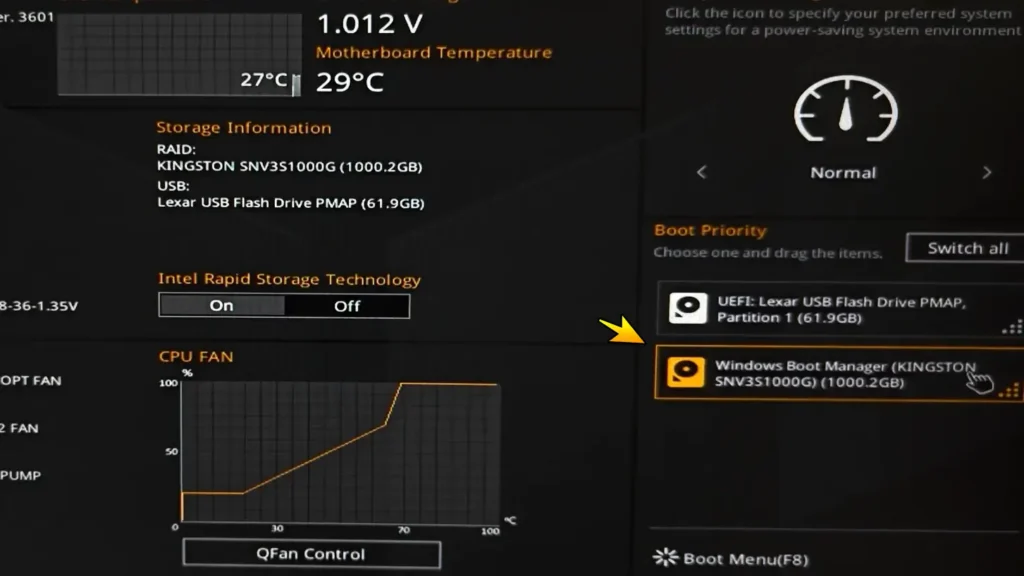
After verifying that my SSD was visible inside BIOS, I started exploring the storage settings.
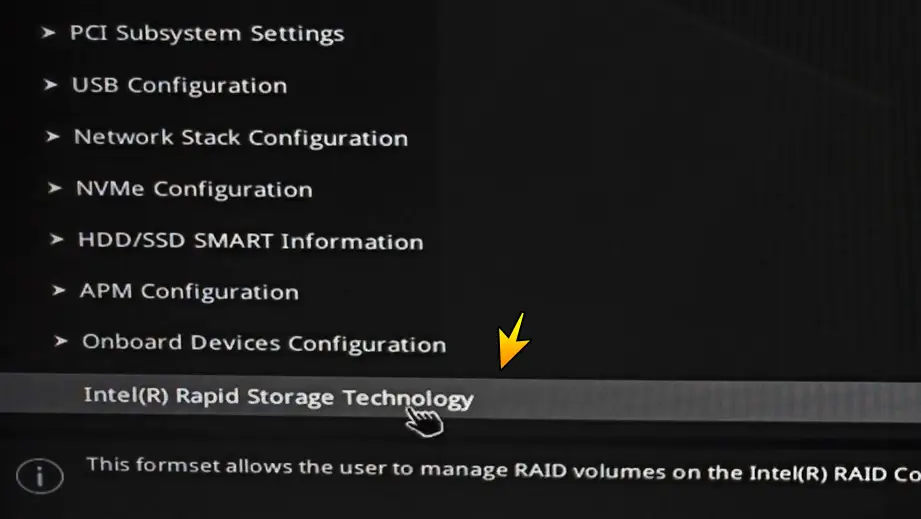
I switched to Advanced Mode and searched for storage-related options.
Eventually, I found:
Intel Rapid Storage Technology
The feature was enabled by default.
Inside the menu, my SSD appeared as a non-array physical disk.
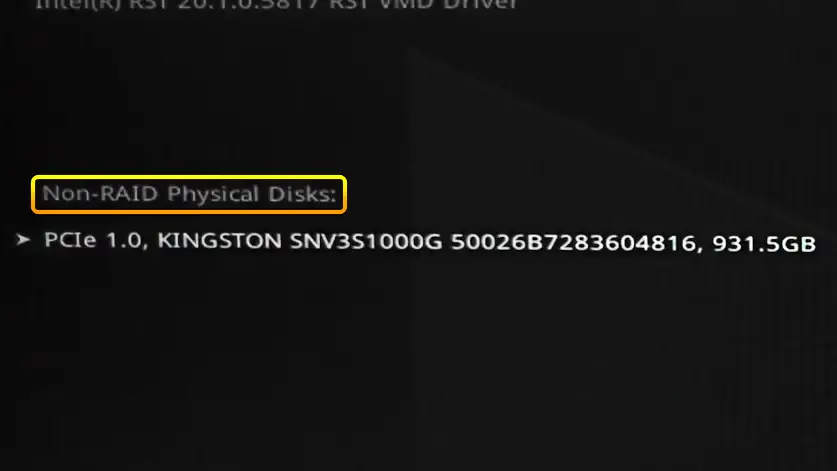
This confirmed once again that the SSD itself was functioning correctly.
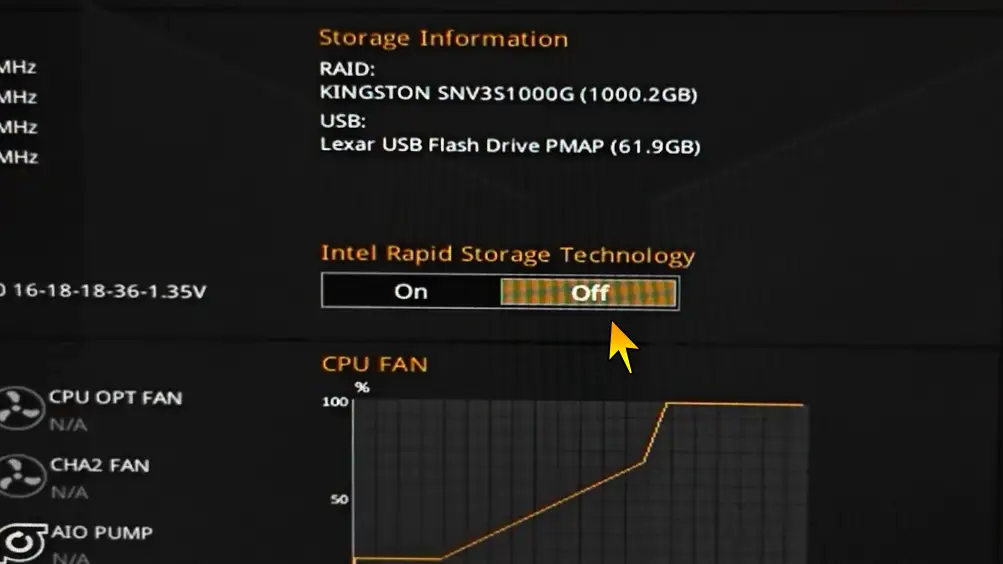
I decided to disable Intel Rapid Storage Technology and save the changes.
After restarting the system, I booted back into the Windows 11 installer.
The result was immediate.
The SSD appeared normally on the installation screen.
No additional drivers were required.
Windows Setup recognized the drive instantly.
How to Disable Intel Rapid Storage Technology
The exact location varies between manufacturers, but the process is usually similar.
Step 1: Enter BIOS or UEFI
Restart your computer and enter BIOS using the appropriate key for your system.
Step 2: Switch to Advanced Mode
Many systems hide advanced storage settings behind an Advanced Mode menu.
Step 3: Navigate to Storage Settings
Look for options such as:
- Intel Rapid Storage Technology
- Intel RST
- Intel VMD Controller
- Storage Controller
- RAID Configuration
Step 4: Disable Intel Rapid Storage Technology
Turn off Intel RST or switch the storage mode away from RAID if applicable.
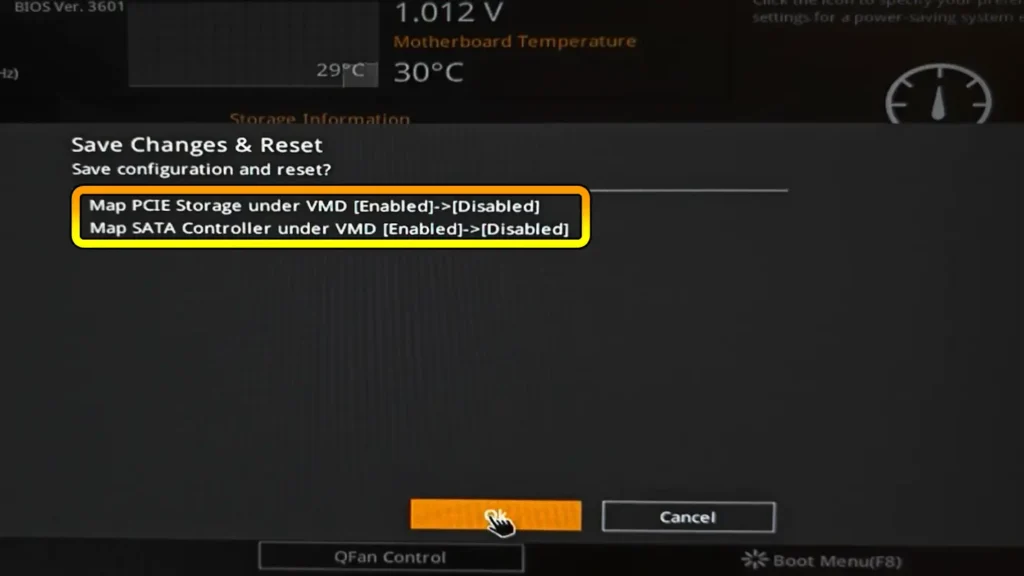
Step 5: Save Changes and Restart
Save the new BIOS configuration and restart the computer.
Step 6: Boot From the Windows Installation USB
Start the Windows installer again.
Step 7: Check the Drive Selection Screen
If Intel RST was causing the issue, the SSD should now appear in Windows Setup.
Additional Settings You May Need to Disable
Some systems automatically disable related storage features when RST is disabled.
Others require manual adjustments.
Depending on your laptop or motherboard, you may also see options such as:
- Intel VMD Controller
- PCIe Storage Remapping
- RAID Mode
- Storage Mapping
If RST is disabled but the SSD still does not appear, review these settings as well.
Always consult your system documentation before making major BIOS changes.
Why Disabling RST Works
When Intel Rapid Storage Technology is enabled, Windows communicates with storage devices through Intel’s storage controller.
The controller often requires dedicated drivers.
Without those drivers, Windows Setup cannot access the SSD.
Disabling RST removes this dependency and allows Windows Setup to communicate directly with the NVMe drive.
This is why the SSD suddenly becomes visible.
Alternative Method: Load Intel RST Drivers
Sometimes disabling RST is not desirable.
For example:
- Corporate systems
- RAID configurations
- Specialized workstation setups
In these situations, you can manually load the required storage drivers.
Step 1: Visit Your Manufacturer’s Support Website
Download the latest Intel RST or Intel VMD driver for your specific laptop or motherboard.
Step 2: Extract the Driver Files
Extract the downloaded package to a USB flash drive.
Step 3: Start Windows Setup
Boot into the Windows installer.
Step 4: Click “Load Driver”
When no drives appear, select the Load Driver option.
Step 5: Browse to the Driver Location
Navigate to the extracted driver files.
Step 6: Install the Driver
Install the appropriate storage driver.
Step 7: Verify SSD Detection
After the driver loads successfully, Windows Setup should detect the SSD.
What If the SSD Does Not Appear in BIOS?
This is a different problem entirely.
If the SSD is missing from BIOS, Windows Setup cannot possibly detect it.
Possible causes include:
Improper Installation
Remove the SSD and reinstall it carefully.
Faulty M.2 Slot
The motherboard slot may be damaged.
Faulty SSD
The drive itself may have failed.
Compatibility Issues
Some older systems only support SATA-based M.2 drives.
Others support only NVMe drives.
Verify compatibility before purchasing hardware.
BIOS Update Required
Some older laptops require BIOS updates before supporting newer SSD models.
Warning Before Deleting Partitions
Once the SSD appears, you may want to clean the drive before installing Windows.
Be careful.
Deleting partitions permanently erases all stored data.
Before continuing, make sure important files are backed up to:
- External HDD
- External SSD
- Cloud storage
- NAS server
- Another computer
Always double-check the selected drive before deleting anything.
Personally, I always keep important files on a separate backup drive before reinstalling Windows. A few extra minutes spent creating a backup can save hours—or even days—of frustration later.
Other Troubleshooting Methods
If the SSD remains invisible after disabling RST, try the following solutions.
Recreate the Installation USB
Corrupted installation media can cause unusual behavior.
Create a fresh installation USB using:
- Microsoft Media Creation Tool
- Rufus
- An official Windows ISO
Try a Different USB Port
Some systems behave differently depending on the USB controller being used.
Switching ports occasionally solves installation issues.
Reset BIOS to Default Settings
Incorrect BIOS settings can interfere with storage detection.
Loading default settings may help.
Disconnect Additional Drives
If multiple drives are connected, temporarily disconnect them.
This simplifies troubleshooting and reduces potential conflicts.
Test the SSD in Another Computer
Testing the drive elsewhere can quickly confirm whether the SSD is functioning properly.
Update BIOS
Manufacturers often release BIOS updates that improve storage compatibility.
If your BIOS is several years old, updating it may resolve SSD detection issues.
My Experience
In my case, the solution turned out to be much simpler than I expected.
Initially, I assumed the SSD might be defective because Windows Setup could not detect it.
However, BIOS recognized the drive perfectly.
After exploring BIOS settings, I discovered Intel Rapid Storage Technology was enabled.
The moment I disabled it and restarted the installation process, Windows immediately detected the SSD.
No drivers were installed.
No additional tools were required.
The Windows 11 installation completed successfully without any further issues.
If your SSD appears in BIOS but not in Windows Setup, checking Intel RST settings should be one of the first troubleshooting steps you try.
If your SSD is now detected correctly and you are planning to replace an older hard drive, you may also find my guide on how to upgrade an HDD to an SSD without reinstalling Windows helpful.
Final Thoughts
When Windows 11 fails to detect an NVMe SSD during installation, the problem is often related to BIOS storage configuration rather than a faulty drive.
If your SSD appears inside BIOS but not inside Windows Setup, Intel Rapid Storage Technology or RAID mode may be preventing Windows from accessing the drive.
In my situation, disabling Intel RST solved the problem immediately.
While every system is different, this simple adjustment may save you a significant amount of time and frustration.
Before replacing hardware or assuming the SSD is defective, spend a few minutes checking your BIOS storage settings.
The solution may be much easier than you expect.
Frequently Asked Questions (FAQ)
Why does Windows 11 installer not detect my NVMe SSD?
The most common causes include Intel Rapid Storage Technology, RAID mode, missing storage drivers, BIOS configuration issues, or outdated firmware.
Can a faulty SSD still appear in BIOS?
In some rare cases, yes, but if the SSD consistently appears in BIOS, it is usually functioning correctly.
Is it safe to disable Intel Rapid Storage Technology?
For most home users performing a clean Windows installation, yes. However, systems using RAID arrays should be configured carefully before making changes.
What is Intel VMD?
Intel Volume Management Device (VMD) is a storage controller technology that often works together with Intel Rapid Storage Technology. Disabling it may help Windows detect an SSD during installation.
Do all NVMe SSDs require additional drivers?
No. Most modern NVMe SSDs work natively with Windows 11. The issue is usually related to the storage controller or BIOS configuration rather than the SSD itself.
Will disabling RST improve SSD performance?
Generally, no. The purpose of disabling RST is to improve compatibility during Windows installation rather than increase performance.
Should I update BIOS before installing Windows 11?
If your system has an older BIOS version, updating it can improve SSD compatibility and overall stability.
Can Windows 10 have the same problem?
Yes. The same issue can occur with both Windows 10 and Windows 11 because the root cause is usually BIOS configuration rather than the operating system itself.
Can this issue happen with SATA SSDs too?
Yes. While NVMe drives are more commonly affected, SATA SSDs can also fail to appear during Windows installation due to storage controller settings, RAID configurations, or missing drivers.
What should I do if disabling RST does not work?
Try loading the appropriate Intel storage drivers, updating BIOS, recreating the installation USB, checking SSD compatibility, and verifying that the drive is detected consistently in BIOS.