Many people want to connect two pairs of Bluetooth headphones or earbuds to one PC at the same time. For example, maybe you want to watch a movie with another person, listen to music together, or share audio from YouTube, Netflix, or any other app without using speakers.
The problem is that Windows usually plays sound through only one audio output device at a time. You can connect several Bluetooth devices to your computer, but that does not always mean you can play the same audio through both of them simultaneously.
Fortunately, there is a free solution that works quite well. In this guide, I will show you how to connect two Bluetooth headphones, two wireless earbuds, or one pair of earbuds and one pair of headphones to the same Windows PC using Voicemeeter Banana.
I tested this method on Windows 11 with one pair of wireless earbuds and one pair of Bluetooth headphones, but the same method should also work on Windows 10. In my case, both devices played audio at the same time with clear sound, and I was also able to adjust the volume of each device separately.
This method is especially useful if you want to watch movies or videos together without disturbing anyone around you.
What You Will Need
Before we start, here is what you need:
- A Windows 10 or Windows 11 PC
- Two Bluetooth audio devices
- Voicemeeter Banana
- A working Bluetooth adapter
- A few minutes to configure everything
You can use:
- two Bluetooth headphones;
- two pairs of wireless earbuds;
- one pair of earbuds and one pair of headphones;
- one Bluetooth device and one wired device, if needed.
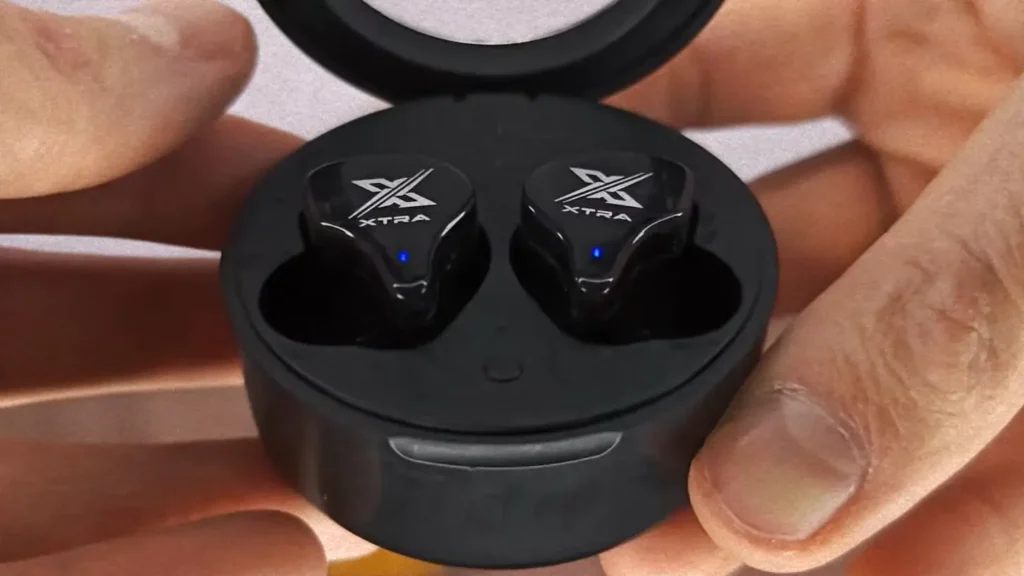
The devices do not have to be the same brand. For example, in my test I used one pair of wireless earbuds and one pair of Bluetooth headphones. The main idea is that both devices must be connected to Windows first, and then Voicemeeter Banana will send the same audio signal to both of them.
Why Use Voicemeeter Banana?
There are different ways to send audio to two devices on Windows, but many of them have one big problem: poor sound quality.
Some utilities can duplicate audio, but after connecting two Bluetooth headphones, the sound may become weak, compressed, delayed, or simply unpleasant to listen to. That is why I recommend using Voicemeeter Banana instead.
Voicemeeter Banana is a virtual audio mixer for Windows. In simple words, it works like a middle layer between Windows and your audio devices. Instead of sending sound directly to one pair of headphones, Windows sends audio to Voicemeeter. Then Voicemeeter sends that audio to two different output devices at the same time.
This is why the method works.
Another advantage is volume control. After setting everything up, you can go to Windows sound settings and adjust the volume of each pair of headphones separately. This is very useful because one pair of earbuds may sound louder than the other.
For example, one person may want the volume at 70%, while the other person may prefer 90%. With this method, you can balance both devices manually.
Is Voicemeeter Banana Free?
Yes, Voicemeeter Banana is free to download and free to use. It is donationware, which means you can use it for free, but you can also support the developer if you find the software useful.
For this guide, you do not need to buy anything. You only need to download and install Voicemeeter Banana from the official VB-Audio website.
I strongly recommend downloading it only from the official website, because this software installs audio drivers, and you do not want to download modified installers from random third-party websites.
Does This Work on Windows 10 and Windows 11?
Yes, this method works on both Windows 10 and Windows 11.
In my test, I used Windows 11, but Voicemeeter Banana also supports Windows 10. The interface may look slightly different depending on your Windows version, but the main steps are the same:
- Install Voicemeeter Banana.
- Restart your computer.
- Connect both Bluetooth headphones.
- Select both devices in Voicemeeter.
- Set Voicemeeter Input as the default playback device.
- Test the sound.
The most important part is not the Windows version, but the correct audio routing.
Important Note Before You Start
After installing Voicemeeter Banana, you must restart your PC.
Do not skip this step.
Voicemeeter installs virtual audio drivers, and Windows needs a reboot to finish the installation correctly. If you do not restart your computer, Voicemeeter may not work properly, or the required audio devices may not appear in Windows sound settings.
So even if the installer finishes successfully, restart Windows before continuing with the setup.
This small step can prevent many problems later.
Step 1: Download Voicemeeter Banana
The first thing you need to do is download Voicemeeter Banana.
Open your browser and search for:
Voicemeeter Banana
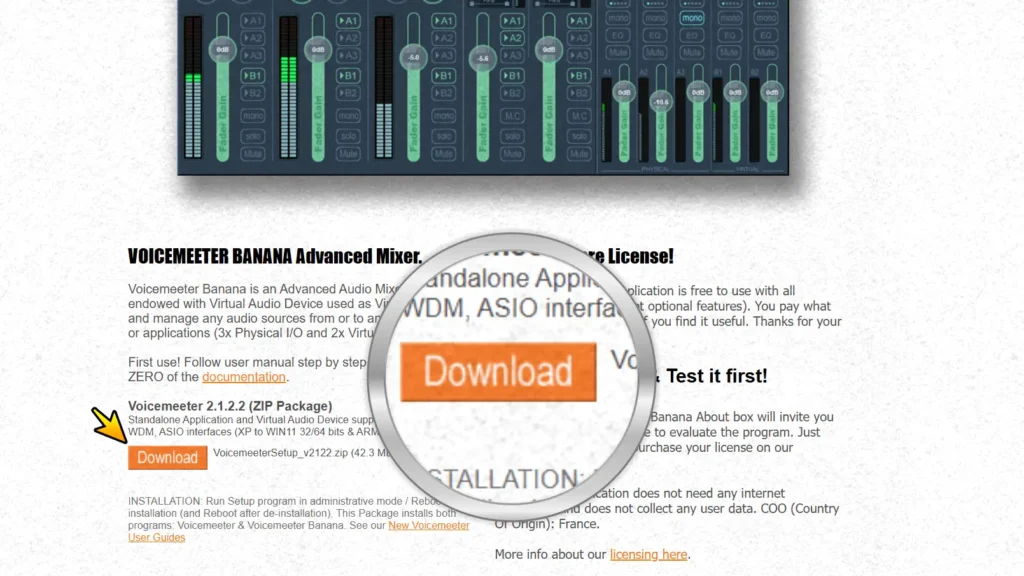
You should see the official VB-Audio website in the results. Open the official page and scroll down until you find the download section.
Usually, you will see a ZIP package for Voicemeeter Banana. The exact version number may be different depending on when you are reading this article, but the process is the same.
Download the ZIP package to your computer.
After the download is complete, open the folder where the file was saved. In most cases, it will be in your Downloads folder.
At this point, do not run anything yet. First, you need to extract the archive.
Step 2: Extract the ZIP Archive
Right-click on the downloaded ZIP file and select Extract All.
Windows will ask where you want to extract the files. You can keep the default location and click Extract.
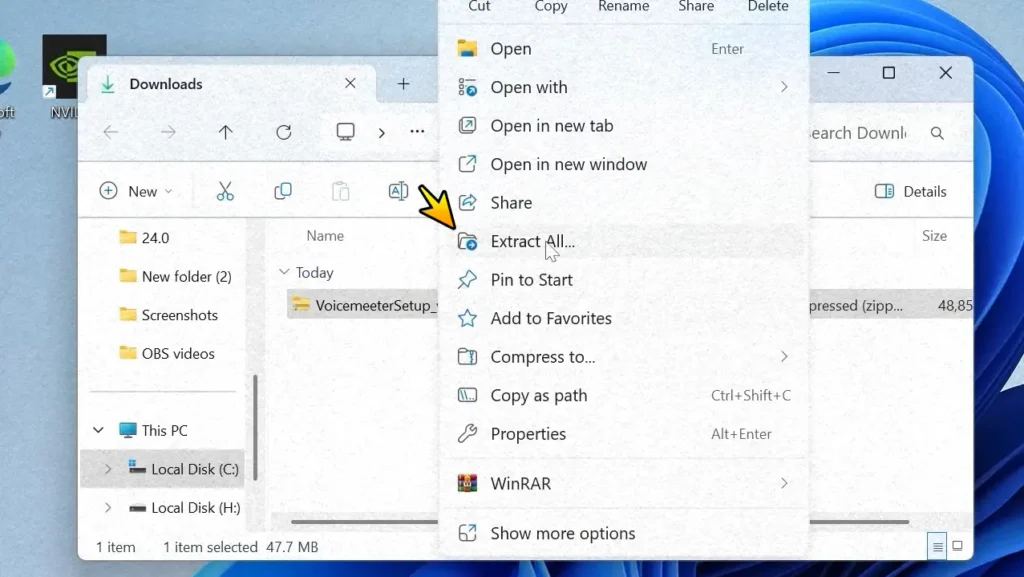
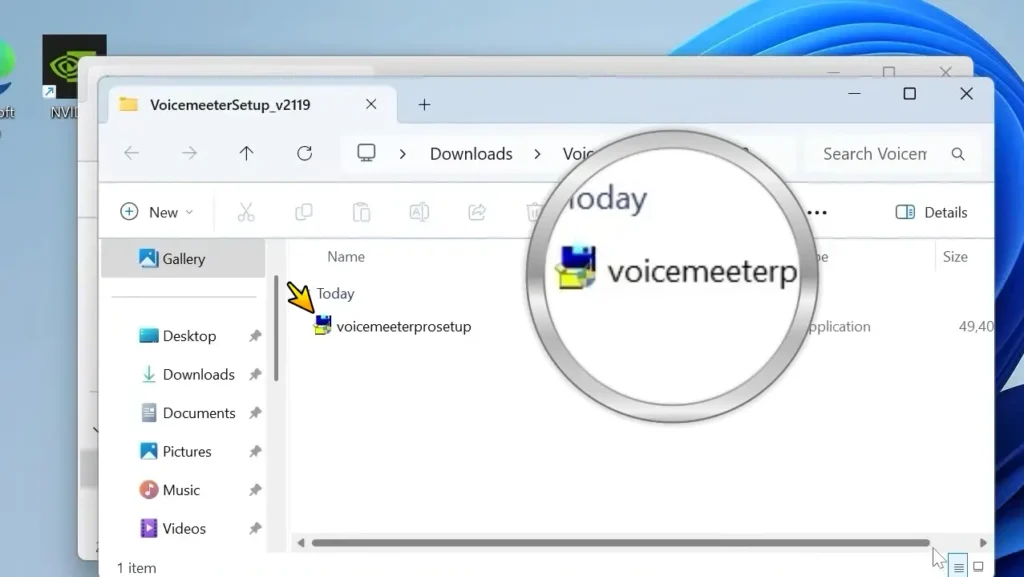
After extracting the archive, open the extracted folder. Inside, you should see the Voicemeeter Banana setup file.
This is the installer you need to run.
Step 3: Install Voicemeeter Banana
Now run the setup file.
If Windows asks for administrator permission, click Yes. This is normal because Voicemeeter installs audio drivers.
In the installer window, click Install.
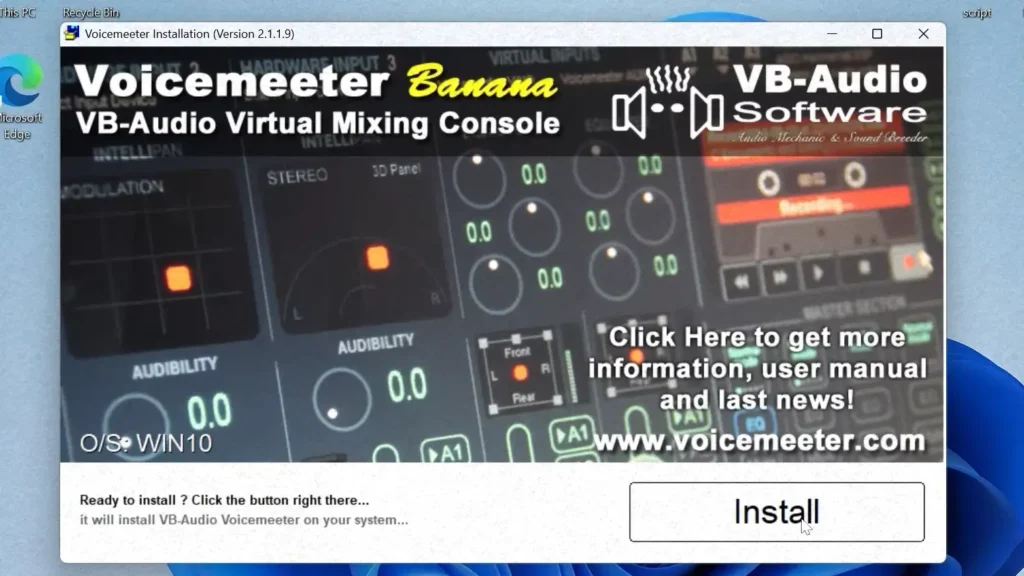
Wait until the installation is complete. It may take a little time, so be patient and do not close the installer too early.
Once the installation finishes, you should see a message that the software was installed successfully.
Now comes the important part: restart your computer.
Again, do not skip the reboot. It is necessary because Voicemeeter adds virtual audio devices to Windows, and they need to be properly initialized after installation.
Step 4: Restart Your PC
After installing Voicemeeter Banana, restart your computer.
Once Windows starts again, you can continue with the next step.
At this point, Voicemeeter Banana should be installed correctly, and Windows should now have new virtual audio devices available in the sound settings.
In the next part, we will connect both Bluetooth headphones to Windows and start configuring Voicemeeter Banana.
Step 5: Connect Both Bluetooth Headphones to Windows
Now that Voicemeeter Banana is installed and your computer has been restarted, it’s time to connect both Bluetooth audio devices.
Before opening Voicemeeter Banana, make sure that both pairs of headphones or earbuds are already connected to Windows. This is an important step because Voicemeeter can only use devices that are currently connected and recognized by the operating system.
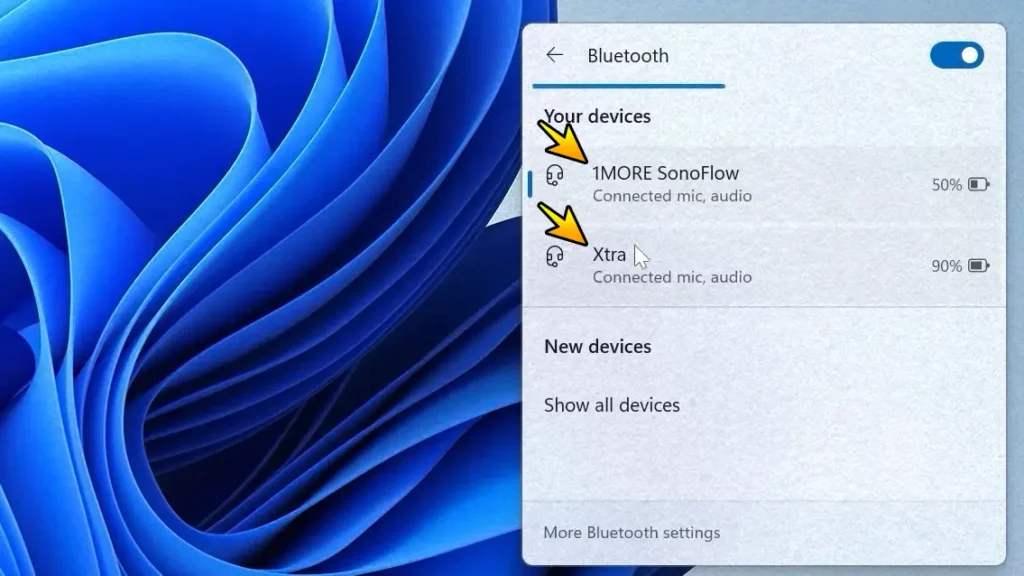
To connect your Bluetooth devices in Windows 11:
- Open Settings.
- Go to Bluetooth & devices.
- Make sure Bluetooth is enabled.
- Turn on your first pair of headphones or earbuds.
- Wait until Windows connects to the device.
- Repeat the same process with your second Bluetooth device.
If both devices have already been paired with your computer before, Windows should reconnect to them automatically after you power them on.
If this is the first time connecting your headphones, click Add device, choose Bluetooth, and follow the pairing process.
After a few seconds, both devices should appear in the Bluetooth devices list as Connected.
Tip: Don’t worry if only one device is currently playing sound. This is completely normal because Windows normally sends audio to only one playback device at a time. We will fix this in the next steps.
Step 6: Launch Voicemeeter Banana
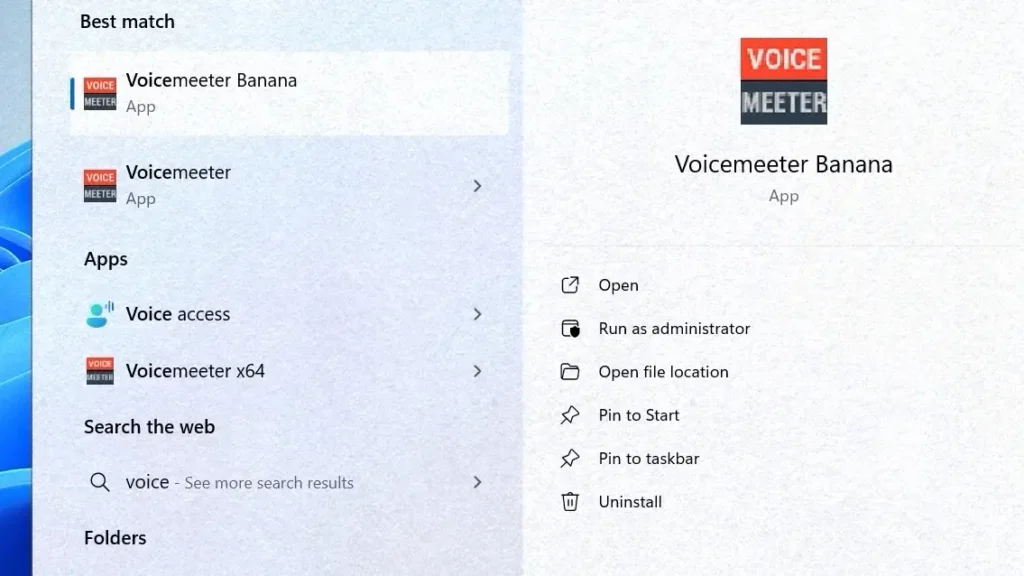
Once both Bluetooth devices are connected, open Voicemeeter Banana.
You can do this by:
- opening the Start menu;
- typing Voicemeeter Banana;
- launching the application.
If Windows asks for administrator permission, click Yes.
When Voicemeeter Banana opens for the first time, the interface may look confusing. There are many buttons, meters, and settings, but don’t worry—you only need to configure a few of them.
For this guide, you only need to focus on the Hardware Out section located in the upper-right corner of the application.
You will see three buttons:
- A1
- A2
- A3
For this tutorial, we only need A1 and A2.
Understanding A1 and A2
Before selecting your headphones, it helps to understand what these buttons actually do.
Voicemeeter Banana can send the same audio signal to multiple output devices simultaneously.
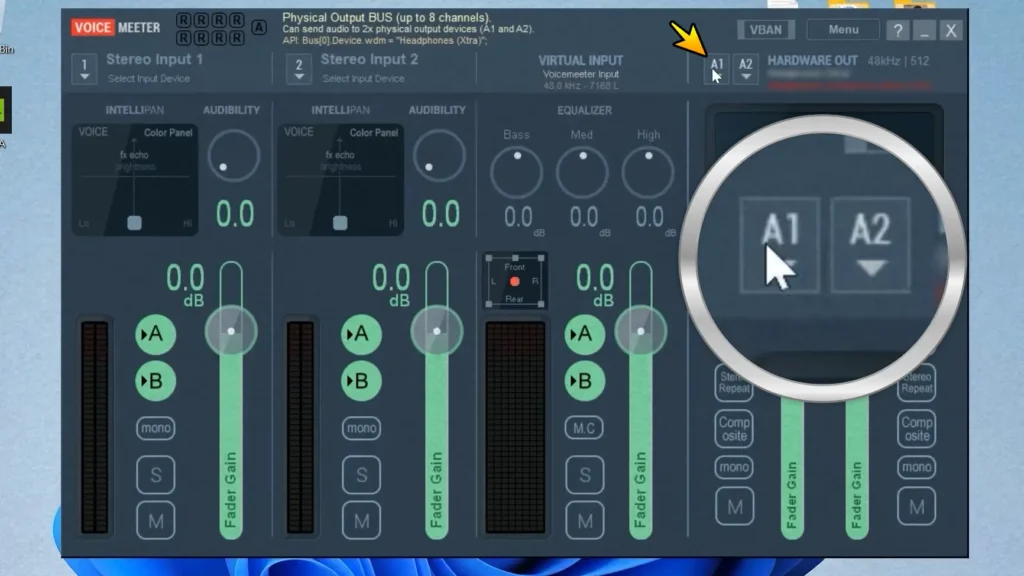
Each output is called a Hardware Output.
- A1 is your first playback device.
- A2 is your second playback device.
- A3 is an optional third playback device.
In this guide:
- your first Bluetooth headphones will be assigned to A1;
- your second Bluetooth headphones will be assigned to A2.
Once this is configured, Voicemeeter will send identical audio to both devices at the same time.
Step 7: Select Your First Pair of Headphones
Click the A1 button.
A list of available audio devices will appear.
Depending on your computer, you may see several categories, including:
- WDM (WASAPI)
- KS (Kernel Streaming)
- MME
- ASIO
You may also notice that the same headphones appear multiple times under different driver types.
For most users, WDM (WASAPI) is the best choice because it usually provides lower latency and better audio performance than MME. The official Voicemeeter documentation also recommends using WDM whenever it is available.
Find your first Bluetooth headphones in the list and select them.
For example, in my case I selected my wireless earbuds first.
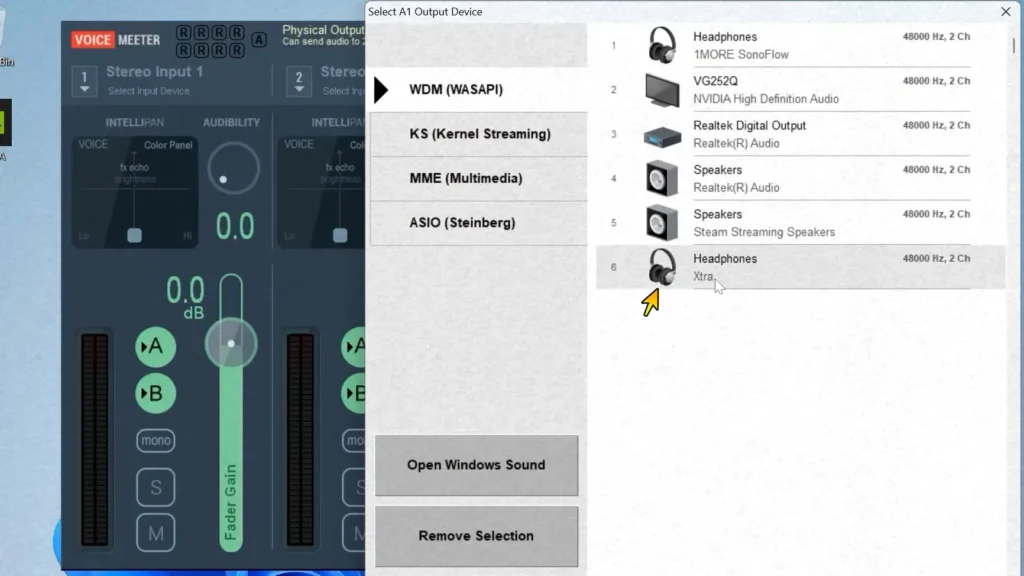
Your device may have a completely different name depending on the manufacturer. Common examples include:
- Soundcore
- SoundPEATS
- Sony
- JBL
- Bose
- AirPods
- Galaxy Buds
Don’t worry if your device name doesn’t match mine. Simply choose the correct Bluetooth playback device.
Step 8: Select Your Second Pair of Headphones
Now repeat the same process for the second Bluetooth device.
Click A2.
Again, a list of available playback devices will appear.
Select your second pair of Bluetooth headphones.
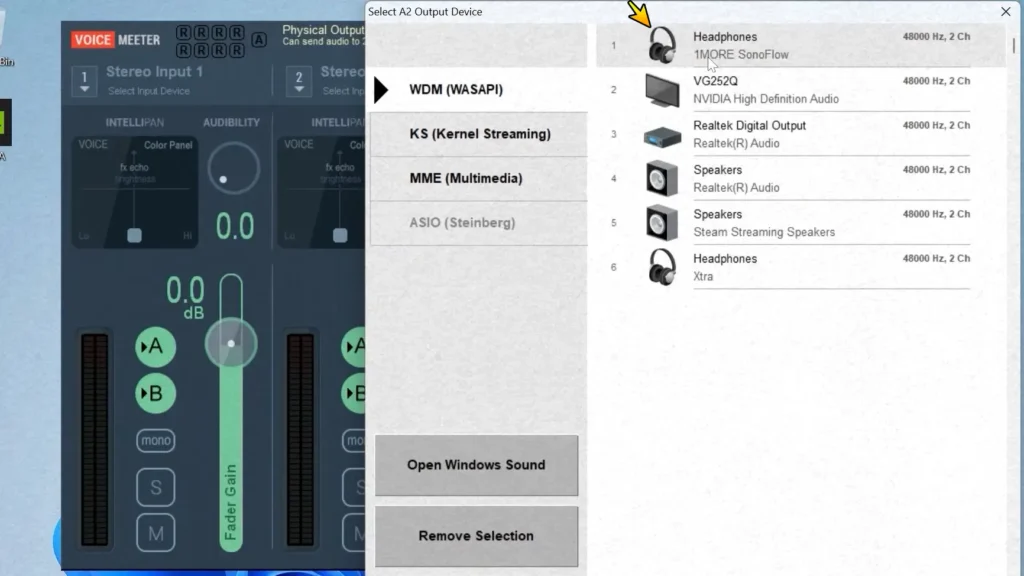
After selecting both devices, Voicemeeter should now know where to send the audio.
At this point, your setup should look something like this:
- A1 → First Bluetooth headphones
- A2 → Second Bluetooth headphones
Although the configuration looks complete, there is one situation that sometimes confuses users.
What If Your Bluetooth Headphones Don’t Appear?
Sometimes one of your Bluetooth devices may not appear in the list after you connect it.
For example, during my testing, one pair of earbuds disappeared from the list immediately after I connected the second Bluetooth device.
Fortunately, this is usually very easy to fix.
Simply:
- Click A1 again.
- Open the device list one more time.
- Wait a few seconds.
- Select the Bluetooth headphones again.
In my case, the missing earbuds appeared after reopening the list, and everything worked normally afterward.
If this does not solve the problem, try the following:
- disconnect and reconnect the Bluetooth headphones;
- close and reopen Voicemeeter Banana;
- wait a few seconds for Windows to detect the device;
- make sure both Bluetooth devices are still shown as Connected in Windows Settings.
In most cases, one of these steps resolves the issue.
Verify Both Devices Are Selected
Before moving on, take a quick look at the Hardware Output section.
You should now see the names of both Bluetooth devices displayed under A1 and A2.
If both device names are visible, everything is configured correctly so far.
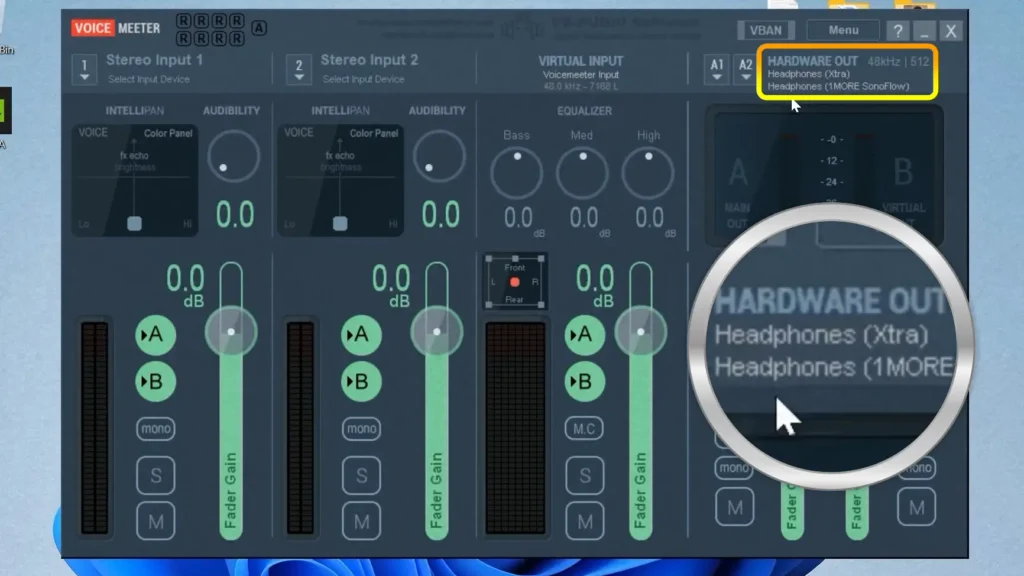
You are now only one step away from making Windows send audio through both devices simultaneously.
However, there is still one important setting left to configure inside Windows.
Without changing the default playback device, Windows will continue sending audio directly to only one headset instead of routing it through Voicemeeter.
In the next section, we’ll configure Windows Sound settings, make Voicemeeter Input the default playback device, test the audio, and finally adjust the volume of each pair of headphones independently.
Step 9: Set Voicemeeter Input as the Default Playback Device
At this point, Voicemeeter Banana already knows which two Bluetooth devices should receive audio. However, Windows is still sending sound directly to your original playback device.
To fix this, we need to tell Windows to send all system audio through Voicemeeter instead.
Fortunately, this only takes a few seconds.
Open Windows Sound Settings
Click the A2 button again or simply open Windows Sound Settings manually.
In Windows 11:
- Right-click the speaker icon in the taskbar.
- Select Sound settings.
Alternatively, you can open Settings → System → Sound.
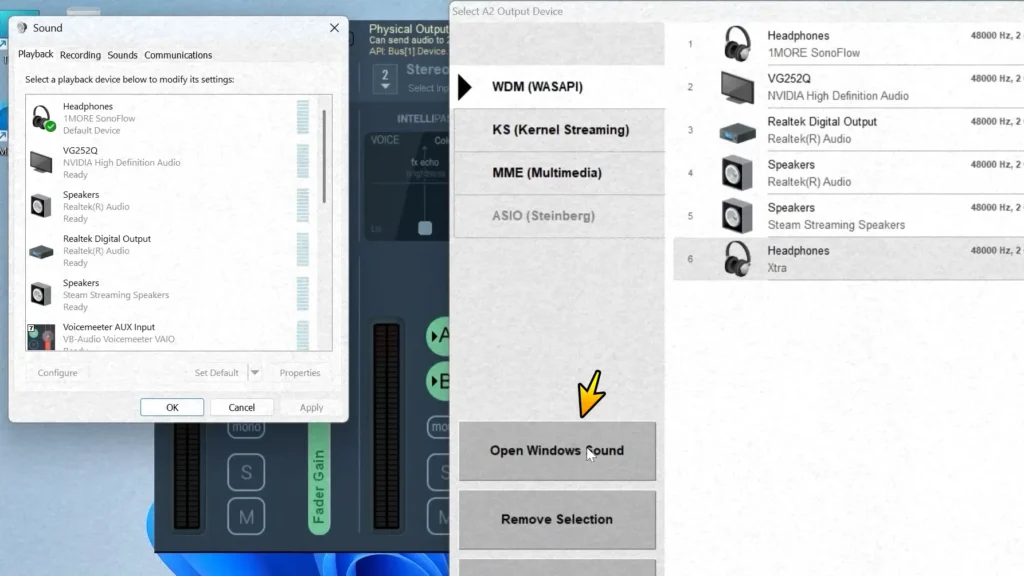
Once the Sound settings window opens, scroll down until you find More sound settings (or Sound Control Panel, depending on your Windows version).
Click it.
Open the Playback Tab
A new window will appear with several tabs.
Open the Playback tab.
Here you will see every playback device installed on your computer.
Besides your Bluetooth headphones, you should also notice several new devices that were installed together with Voicemeeter Banana.
Look for:
Voicemeeter Input
Be careful to select Voicemeeter Input without additional numbers or similar names.
This is the virtual playback device that Windows will use to send all audio into Voicemeeter Banana.
Make Voicemeeter Input the Default Device
Click Voicemeeter Input.
Then click:
Set Default
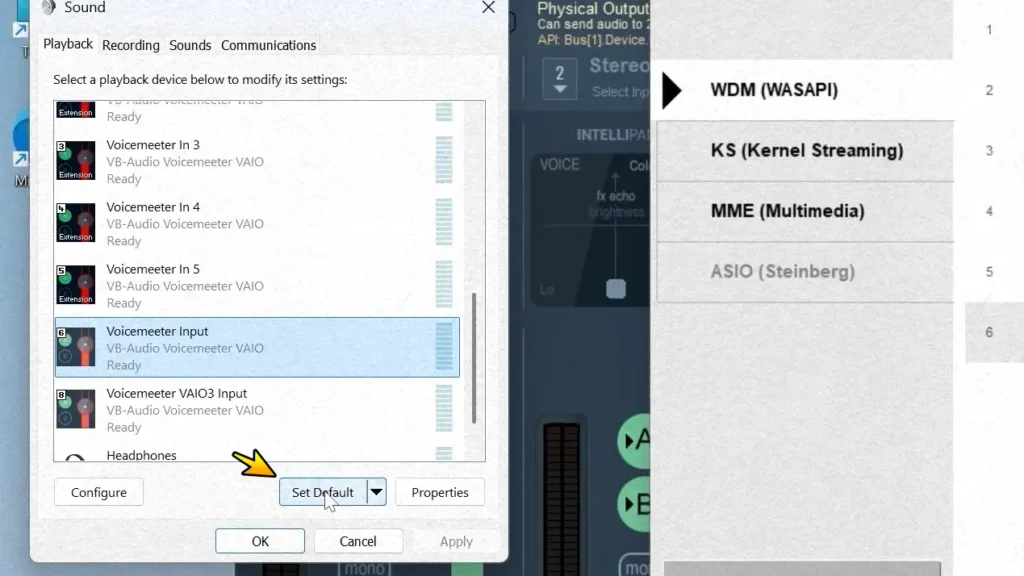
After that, click Apply, then OK.
That’s it.
From now on, every application—including YouTube, Netflix, Spotify, VLC, games, and other media players—will send audio to Voicemeeter Banana first.
Voicemeeter will then duplicate the audio and play it through both Bluetooth devices simultaneously.
This is the key step that makes the whole setup work.
Step 10: Test Your Audio
Now comes the fun part.
Open your favorite media player or streaming service.
For example:
- YouTube
- Netflix
- Disney+
- Spotify
- VLC Media Player
Play any video or song.
If everything has been configured correctly, you should hear the same audio through both Bluetooth headphones at the same time.
During my testing, I used one pair of Bluetooth earbuds and one pair of Bluetooth headphones.
Both devices played audio simultaneously without disconnecting or producing noticeable sound quality issues.
If you can hear audio from both devices, congratulations!
The hardest part of the setup is now complete.
Step 11: Adjust the Volume of Each Pair of Headphones
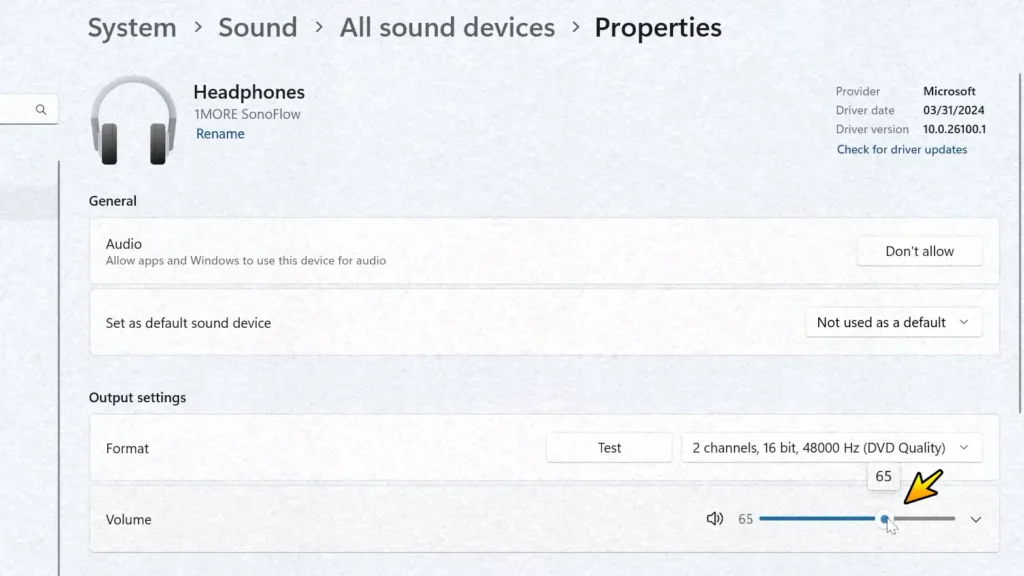
One feature I really like about this method is that you can adjust the volume of each Bluetooth device independently.
This is much more convenient than trying to find a single volume level that works for both listeners.
For example:
- one person may prefer listening at 70%;
- another person may want the volume closer to 90%.
Windows allows you to adjust both devices separately.
Open Sound Settings Again
Open:
Settings → System → Sound
Scroll all the way down and click:
All sound devices
Under Output devices, you should now see both Bluetooth headphones.
For example:
- Bluetooth Headphones
- Bluetooth Earbuds
The exact names will depend on your devices.
Change the Volume
Click your first Bluetooth device.
You will see a volume slider.
Adjust it to the desired level.
For example:
- 70%
Now go back.
Open your second Bluetooth device.
Adjust its volume independently.
For example:
- 90%
Windows remembers these settings, so both devices can keep different volume levels.
This makes sharing music or watching movies much more comfortable because each listener can have a listening level that feels right.
Why This Is Better Than Using Windows Stereo Mix
You may have seen guides recommending Stereo Mix or the Listen to this device option.
While these methods can sometimes work, they often come with disadvantages such as:
- higher audio latency;
- lower sound quality;
- synchronization issues;
- limited compatibility with Bluetooth devices.
Voicemeeter Banana is designed specifically for audio routing.
Instead of relying on old Windows audio features, it creates a virtual audio mixer that can send the same audio stream to multiple playback devices more reliably.
Another advantage is flexibility.
If you ever decide to connect:
- speakers;
- wired headphones;
- Bluetooth earbuds;
- USB audio devices,
you can simply change the Hardware Outputs inside Voicemeeter Banana without repeating the entire setup.
Does This Affect Sound Quality?
This is probably the question I receive most often.
Based on my own testing, the answer is no—or at least not in any noticeable way.
I compared this method with several other software solutions that duplicate Windows audio.
Some alternatives produced obvious compression, lower audio quality, or synchronization problems.
Using Voicemeeter Banana, both Bluetooth devices delivered clean, clear audio throughout my testing.
Of course, the final sound quality still depends on your Bluetooth headphones, Bluetooth adapter, audio codec, and wireless signal strength.
However, under normal conditions, Voicemeeter Banana provides excellent audio quality for listening to:
- movies;
- TV shows;
- YouTube videos;
- music;
- podcasts;
- online courses;
- video streaming.
This is one of the main reasons why I continue recommending it over many alternative solutions available today.
Troubleshooting
If everything worked correctly, you should now be able to listen to the same audio through two Bluetooth headphones at the same time.
However, because every computer is different, you may occasionally run into an issue during the setup process.
Below are the most common problems users experience and the easiest ways to solve them.
No Sound After Installing Voicemeeter Banana
If you don’t hear any sound after installing Voicemeeter Banana, don’t panic.
This is one of the most common situations and is usually caused by Windows using the wrong default playback device.
Solution
First, make sure that Voicemeeter Banana is actually running.
Then:
- Open Windows Sound Settings.
- Open the Playback tab.
- Verify that Voicemeeter Input is set as the default playback device.
- Check that your Bluetooth headphones are still selected under A1 and A2 inside Voicemeeter.
If everything looks correct, restart Voicemeeter Banana.
If the problem still exists, restart Windows one more time.
According to the official Voicemeeter documentation, Windows may automatically change the default playback device after installing new audio drivers. This is normal and can usually be corrected by selecting the proper playback device again.
My Bluetooth Headphones Don’t Appear in Voicemeeter
Sometimes Windows connects your Bluetooth headphones successfully, but Voicemeeter does not immediately display them in the Hardware Output list.
Fortunately, this usually isn’t a software bug.
Try these solutions:
- Disconnect the Bluetooth headphones.
- Connect them again.
- Wait a few seconds.
- Open the A1 or A2 menu again.
- Select the device once more.
During my own testing, one pair of earbuds disappeared from the list after connecting the second Bluetooth device.
Simply reopening the device list solved the problem.
If necessary, close Voicemeeter Banana and launch it again after reconnecting your headphones.
Both Bluetooth Devices Are Connected, but Only One Plays Audio
This almost always means Windows is still sending audio directly to one device instead of routing it through Voicemeeter.
Check the following:
- Is Voicemeeter Input the default playback device?
- Is Voicemeeter Banana currently running?
- Are both headphones assigned to A1 and A2?
- Are both Bluetooth devices still connected?
If one of these settings is incorrect, Windows will only play sound through one device.
The Sound Is Delayed
Bluetooth audio always introduces a small amount of latency.
This is completely normal.
However, if the delay feels unusually long, try selecting a different driver type inside Voicemeeter.
When available, choose the WDM (Windows Driver Model / WASAPI) version of your playback device.
The official documentation recommends WDM because it generally provides lower latency and better performance than MME drivers.
If WDM is unavailable or doesn’t work correctly with your hardware, you can try MME instead.
Audio Keeps Stuttering or Cracking
Occasional crackling usually isn’t caused by Voicemeeter itself.
Instead, it may happen because:
- the Bluetooth signal is weak;
- the Bluetooth adapter is overloaded;
- another application is using the audio device exclusively;
- Windows temporarily loses the Bluetooth connection.
Try the following:
- Move closer to your computer.
- Disconnect unnecessary Bluetooth devices.
- Close applications that may be using audio exclusively.
- Restart Voicemeeter Banana.
- Reconnect your Bluetooth headphones.
In most cases, these simple steps solve the issue.
One Pair of Headphones Is Much Louder Than the Other
This is completely normal.
Different headphones have different maximum output levels.
Fortunately, Windows allows you to adjust each playback device separately.
Simply open:
Settings → System → Sound → All sound devices
Then:
- Open your first Bluetooth device.
- Adjust its volume.
- Return to the device list.
- Open the second Bluetooth device.
- Adjust its volume independently.
Once configured, Windows remembers these volume levels.
Windows Automatically Switched Back to Another Playback Device
Sometimes Windows changes the default playback device after:
- reconnecting Bluetooth headphones;
- installing Windows updates;
- reconnecting USB audio devices.
If audio suddenly stops working through both headphones, simply verify that Voicemeeter Input is still selected as the default playback device.
If necessary, select it again.
This only takes a few seconds.
Frequently Asked Questions
Can I Connect Two Bluetooth Headphones to One Windows PC?
Yes.
Using Voicemeeter Banana, you can send the same audio to two Bluetooth playback devices simultaneously.
This works well for:
- movies;
- YouTube;
- Netflix;
- Spotify;
- podcasts;
- online courses;
- local video files.
Does This Work on Windows 10?
Yes.
The setup process is almost identical on Windows 10.
Some menus may look slightly different, but the configuration steps remain the same.
Does This Work on Windows 11?
Absolutely.
In fact, this guide was created using Windows 11.
Can I Use Two Pairs of Wireless Earbuds?
Yes.
The devices don’t have to be different.
You can use:
- two Bluetooth earbuds;
- two Bluetooth headphones;
- one headset and one pair of earbuds.
Any combination should work as long as Windows detects both playback devices.
Can I Use Wired and Bluetooth Headphones Together?
Yes.
Voicemeeter Banana doesn’t require both devices to be Bluetooth.
For example, you can use:
- USB headphones;
- 3.5 mm wired headphones;
- HDMI audio;
- Bluetooth headphones.
Simply assign one device to A1 and the other to A2.
If you also use external audio devices with your phone, you can read my guide on how to connect a USB microphone to a smartphone.
Is Voicemeeter Banana Safe?
Yes.
Voicemeeter Banana has been available for many years and is widely used by content creators, streamers, musicians, and audio professionals.
To avoid modified installers, always download it from the official VB-Audio website.
Is Voicemeeter Banana Really Free?
Yes.
Voicemeeter Banana is donationware.
You can download, install, and use it without purchasing a license.
If you enjoy the software and want to support future development, you can make a voluntary donation to the developer.
Will This Reduce Audio Quality?
Based on my testing, no.
I compared several different methods for duplicating Bluetooth audio, and Voicemeeter Banana consistently produced the best results.
Both Bluetooth devices delivered clean audio without the noticeable quality loss that I experienced with some alternative software.
Of course, the final audio quality still depends on your Bluetooth hardware and headphones, but under normal conditions the listening experience should be excellent.
Final Thoughts
If you’ve followed every step in this guide, you should now be able to listen to the same audio through two Bluetooth headphones at the same time.
Although Windows doesn’t offer this feature out of the box, Voicemeeter Banana makes it surprisingly easy once everything is configured correctly.
During my own testing, I connected one pair of Bluetooth earbuds and one pair of Bluetooth headphones to a Windows 11 PC. After selecting both devices inside Voicemeeter Banana and setting Voicemeeter Input as the default playback device, both devices worked simultaneously without disconnecting or introducing any noticeable loss in sound quality.
One feature I especially appreciate is the ability to adjust the volume of each device independently. This makes sharing music, movies, YouTube videos, or online courses much more comfortable because each person can choose a listening level that suits them.
If you ever replace your Bluetooth headphones in the future, you don’t need to repeat the entire setup from scratch. Simply connect the new device, select it in A1 or A2, and you’re ready to go again.
When This Method Is Most Useful
Although this guide focuses on sharing audio between two Bluetooth headphones, there are many situations where this setup can be useful.
For example, you can use it to:
- Watch Netflix together without disturbing others.
- Listen to music with a friend.
- Watch YouTube videos while traveling.
- Share online courses or educational videos.
- Watch movies on a laptop during a flight.
- Listen to podcasts together.
- Play local video files in VLC Media Player.
- Enjoy late-night entertainment without using speakers.
Since Voicemeeter Banana routes audio at the system level, it works with almost every application that plays sound through Windows.
Why I Still Recommend This Method
Over the years, I’ve tested several different methods for playing audio through two headphones on Windows.
Some relied on the old Stereo Mix feature, while others used various third-party utilities.
Although a few of them worked, many introduced problems such as:
- reduced audio quality;
- synchronization issues;
- higher latency;
- unstable Bluetooth connections;
- complicated configuration.
Voicemeeter Banana remains my preferred solution because it combines several important advantages:
- completely free to use;
- works on both Windows 10 and Windows 11;
- supports multiple playback devices;
- offers very good audio quality;
- allows separate volume control for each device;
- remains flexible enough for more advanced audio setups if you ever need them.
For most users who simply want to share music or watch a movie together, it provides an excellent balance between simplicity and functionality.
Watch the Video Tutorial
If you prefer following the setup visually, I also created a complete video tutorial that demonstrates every step shown in this guide.
The video includes:
- downloading Voicemeeter Banana;
- installing the software;
- connecting two Bluetooth devices;
- configuring Hardware Outputs (A1 and A2);
- changing the Windows playback device;
- adjusting the volume of each headset;
- testing the final setup.
Sometimes it’s easier to follow the process on screen, especially if you’re using Voicemeeter Banana for the first time.
Frequently Updated Guide
Windows and Voicemeeter Banana continue to receive updates over time.
Whenever Microsoft changes the Windows audio interface or the developers release a new version of Voicemeeter Banana, I’ll update this guide if any important steps change.
That way, you’ll always have an up-to-date tutorial that works with the latest versions of Windows.
Have Questions?
If something didn’t work as expected, or if you found another solution that worked better on your hardware, feel free to leave a comment below.
Please include:
- your Windows version;
- the model of your Bluetooth headphones or earbuds;
- the Bluetooth adapter you’re using (if applicable);
- a short description of the problem.
The more information you provide, the easier it will be to help you find a solution.
Conclusion
Connecting two Bluetooth headphones to one Windows PC might seem impossible at first, but with the right software, the process is actually quite straightforward.
Voicemeeter Banana allows Windows to route the same audio stream to multiple playback devices while maintaining excellent sound quality and giving you independent control over each device’s volume.
Whether you want to watch movies together, listen to music with a friend, or share online content without using speakers, this method is reliable, completely free, and works with both Windows 10 and Windows 11.
Once you’ve configured everything for the first time, reconnecting your Bluetooth devices in the future usually takes only a few seconds.
If this guide helped you, consider bookmarking it so you can easily return whenever you need to set up another pair of headphones or troubleshoot your audio configuration after a Windows update.
Happy listening!